The company Energosteel uses a round billet steel from alloyed steel grades according to specifications for the high-quality grinding balls production. There is a large number of different mechanical characteristics of the metal taken into account in the production of grinding balls. The process parameters of metal heat treatment are also important. The metal hardness measurement of finished products (steel grinding balls) is carried out more frequently than other tests, because this indicator is one of the main parameters for understanding the term ” grinding media quality “. Let’s consider the hardness definition features in more detail.
The hardness is a resistance to surface deformation or destruction of the during the application of strong pressure. All methods of the materials hardness determining (grinding balls) can be divided into several main groups:
Static methods are characterized in that the load gradually increases. The exposure time can vary – it varies from the features of the method used.
Dynamic methods are characterized in that the load on the sample is supplied with a certain kinetic energy. At the same time, the hardness index is less accurate, because during a dynamic drop, a certain impact occurs due to the material elasticity. The results of such tests are often called the hardness of materials on impact.
Kinetic methods are based on continuous registration of indicators during testing, which allows you to get not only the final but also an intermediate result. For this purpose, special equipment is used.
In addition, the categorization of the hardness determination methods is carried out according to the principle of the applied load. There are the following ways to test the sample.
The pressure is the most common way today to determine the indicator under consideration.
In case of the rebound the height of the striker’s rebound from the test sample surface is measured. In this case, the hardness is calculated by the resistance indicator of elastic deformation. Such methods are often used to control the quality of rolling rollers and large products.
Scratching and cutting techniques are rarely used today. They were developed two centuries ago. Let’s consider the most popular methods of grinding balls hardness measuring used today.
Rockwell Hardness Measurement

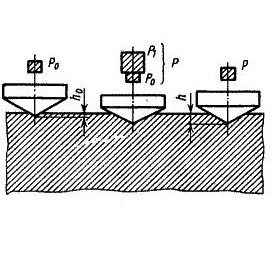
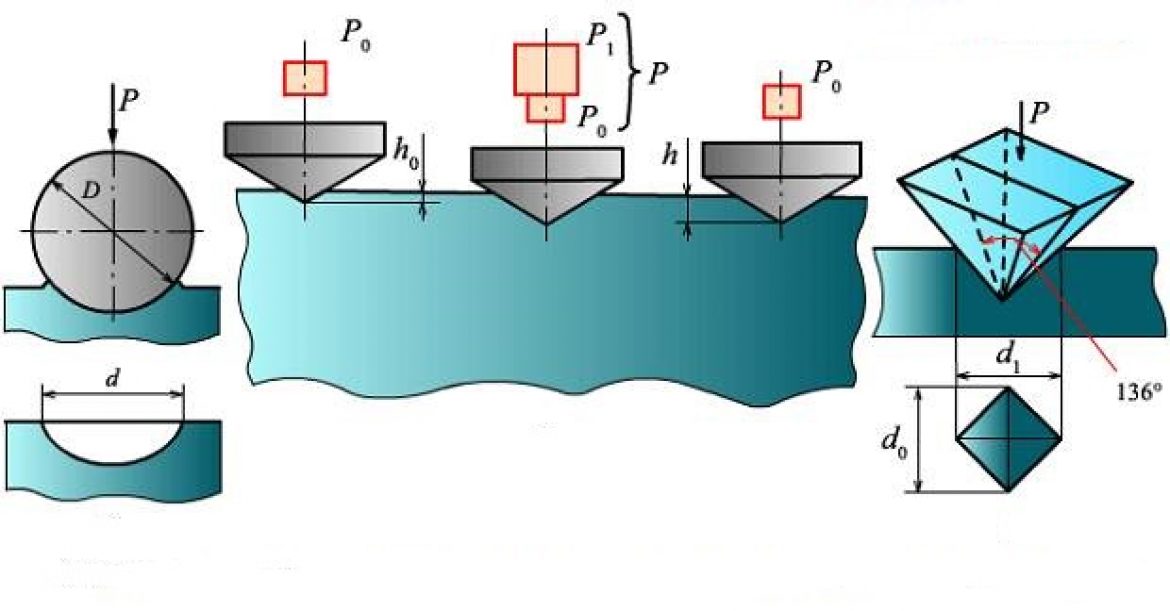
A special hardness tester is used, which allows to create two consecutive loads applied to the sample surface. The features of this test are as follows:
First, the preload is, then the second is added.
The second load is removed after holding under the total load for 3-5 seconds, the depth of the print is measured, then the preload is removed.
The measurement of the data obtained is carried out in arbitrary units, which are equal to the indicator axial displacement by 0.002.
The Rockwell hardness index is determined by the special scale of the instrument.
The shape of the indicator used may vary. That is why several types of measuring scales were introduced, which correspond to a specific form of the indicator.
The HRC symbol is used to indicate the value obtained (Hardness Rockwell). The company Energosteel measures the hardness of the grinding balls produced by the Rockwell method. You can see more about this here.
Brinell Hardness Measurement.

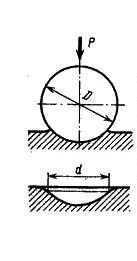
Brinell Hardness Measurement is most commonly made. This method is regulated by GOST 9012. The features of testing metals and alloys by this method include the following points:
A steel ball is used as the body that will affect the test sample. A ball from hardened steel with a certain diameter is used for testing. The constantly increasing load attached to it. The main condition for the application of this method is that the metal from which the ball is made must be harder than the tested sample. . The resulting imprint on the surface is measured after completion of the test. This method allows to get data in HB units (Hardness Brinell). This designation today is found more often in various reference documentation.
It should be noted that according to Brinell’s method the test of steels and alloys, which hardness exceeds the 450HB value, is discouraged.
Vickers hardness measurement

This method has become widespread in determining the hardness of parts and workpieces that are small in thickness.
Moreover, it can be used to measure the hardness of parts with a solid surface.
The features of this method include the following points:
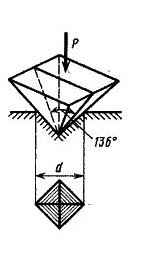
A so-called diamond tip is used, which has a pyramid shape with four faces and equal sides.
A certain exposure time is selected.
After the load is removed, the diagonal dimensions of the resulting print are measured and the average value is calculated.
The value of the applied load is regulated, it can be selected depending on the type of test material.
The results are expressed in HV units (Hardness Vickers).
In some cases, after the value obtained, the exposure time and the value of the applied load are indicated, allowing the definition of hardness value with greater precision.
There is no connection between the data should be taken into account when selecting the hardness measurement method.
It should be taken into account that there is no connection between the results obtained when selecting the hardness measurement method.
So in other words, an exact conversion of one measuring unit into another is impossible.
The tables of interrelations used have no physical meaning, as they are empirical.
The lack of dependence can also be attributed to the fact that when testing different loads and different forms of tips are used.
There are special tables for quick and approximate conversion of various hardness values.
However, we pay your attention to the fact that existing tables should be used with great caution, because they only give approximate results.
In some cases, the conversion can be very accurate, due to the similar physical and mechanical properties of the test metals.
Below is a table of the conversion of various hardness values. This will help you to make a primary comparison of the hardness values of the grinding balls, which were obtained by different methods:
|
The Rockwell Hardness, HRC |
The Brinell Hardness, HВ |
The Vickers Hardness, HV |
|
72,00 |
782,00 |
1 220,00 |
|
70,00 |
1 076,00 |
|
|
69,00 |
744,00 |
1 004,00 |
|
68,00 |
942,00 |
|
|
67,00 |
713,00 |
894,00 |
|
66,00 |
854,00 |
|
|
65,00 |
683,00 |
820,00 |
|
64,00 |
789,00 |
|
|
63,00 |
652,00 |
763,00 |
|
62,00 |
739,00 |
|
|
61,00 |
627,00 |
715,00 |
|
60,00 |
695,00 |
|
|
59,00 |
600,00 |
675,00 |
|
58,00 |
655,00 |
|
|
57,00 |
578,00 |
636,00 |
|
56,00 |
617,00 |
|
|
55,00 |
555,00 |
598,00 |
|
54,00 |
580,00 |
|
|
54,00 |
532,00 |
562,00 |
|
52,00 |
512,00 |
545,00 |
|
51,00 |
495,00 |
528,00 |
|
50,00 |
513,00 |
|
|
49,00 |
477,00 |
498,00 |
|
48,00 |
460,00 |
485,00 |
|
47,00 |
448,00 |
471,00 |
|
46,00 |
437,00 |
458,00 |
|
45,00 |
426,00 |
446,00 |
|
44,00 |
415,00 |
435,00 |
|
42,00 |
393,00 |
413,00 |
|
40,00 |
372,00 |
393,00 |
|
38,00 |
352,00 |
373,00 |
|
36,00 |
332,00 |
353,00 |
|
34,00 |
313,00 |
334,00 |
|
32,00 |
297,00 |
317,00 |
|
30,00 |
283,00 |
301,00 |
|
28,00 |
270,00 |
285,00 |
|
26,00 |
260,00 |
271,00 |
|
24,00 |
250,00 |
257,00 |
|
22,00 |
240,00 |
246,00 |
|
20,00 |
230,00 |
236,00 |
Regardless of what method is used to measure the grinding balls hardness it is very important to properly prepare the surface for measurement. You can read more about this here. We hope this information will be useful to our readers.
Revealing plans for the near future, we want to say that we plan to place on our website an online calculator for recalculating the various hardness units of grinding balls. You will be informed about this in addition.


